 In the previous part of our series we created the base for a WordPress plugin recognisible by the core. Today we are going to learn how to actually alter the default functionality of the core.
The concept of hooks, actions, and filters is responsible for that; being the real heart of the whole WordPress plugins system.
Everything starts from the "hooks" provided by the core itself.
What is a "hook"? It is a specially marked place in the code (of any script), where some deliberately registered - "hooked into" - functions can be executed in the order defined upon registration.
WordPress has two types of hooks that differ in their purpose:
- Action hook: marks the place to perform an action, for example, process input and store results in a database
- Filter hook: marks the place to apply a modification to a value (normally provided as variable), so that the following code will use the adjusted value
Let's dive into the details…
Working with actions
The common logic of WordPress actions is very simple:
- Mark the place, where the custom code should go, with an "action hook" and its parameters
- Create the action function that executes the new code using (if needed) parameters provided by the hook
- Register the action (#2) to be performed when the hook (#1) is fired with some priority
- When WordPress loads the requested page and finds the hook, it will look for all functions "hooked into" it and execute them one by one in accordance with their priority
To perform task #1 we have the 'do_action' function:
do_action($tag, $arg_1, $arg_2, ... , $arg_n);
It accepts following parameters: $tag - the hook "name" that helps to identify the certain hook and distinguish it among others; $arg_1, $arg_2, ... , $arg_n - values for actions to accept as parameters. There could be as many arguments as needed - from zero up to any reasonable amount.
WordPress itself has a lot of predefined hooks to use:
do_action( 'init' );
This is very straightforward case with no additional parameters. This hook is fired when the most of WordPress is set up and time has come to register custom objects, like custom post type, for example.
do_action('save_post', $post_id, $post);
In this example the hook is fired when post is saved and gives two additional parameters to operate with - post_id and post object containing all the data from the saved post.
But creating hooks is not only a privilege of the core team; every developer can make a custom hook for the plugin (or theme). Thanks to this we have a lot of power, for example, theme frameworks allow child themes to alter not only styles but even the markup of parents without overwriting whole files.
do_action( 'my_truly_custom_hook' );
When we have found (or created) a proper hook and created a custom function for it we should register the latest for the execution with 'add_action'.
add_action($tag, $function_to_add, $priority, $accepted_args_number);
As it could be expected the 'add_action' method accepts two obligatory parameters: $tag: the name of the appropriate hook and $function_to_add: the name of the function that should be executed. The other two parameters are optional: $priority: an integer to specify the order in which the registered functions are executed (by default, 10), $accepted_args_number: number of arguments that the registered function is going to accept (by default, 1).
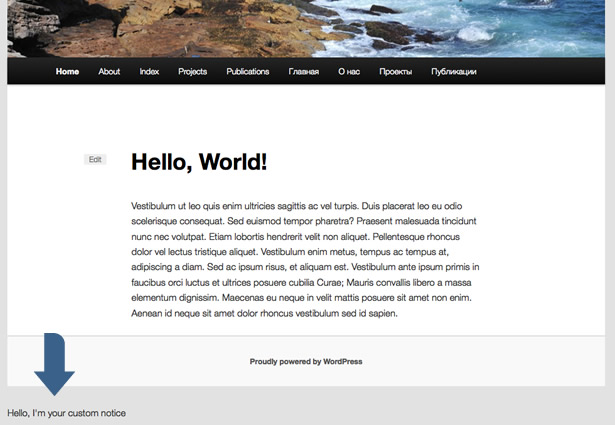
Let's look at an example to illustrate the whole process. Suppose we'd like to add a small notice at the bottom of our site. We could use the 'wp_footer' hook for this because it's a part of obligatory footer code that every theme should include.
function msp_helloworld_footer_notice(){
 echo "<div id='msp-helloworld-notice'>Hello, I'm your custom notice</div>";
}
add_action('wp_footer', 'msp_helloworld_footer_notice');
In this example we create a prefixed function that simply outputs the notice's markup (the importance of the prefixes we have discussed in the previous article, so please refer to it for details) and then hooked it into the 'wp_footer'. Once we include this code in the our plugin file (also discussed in the previous article), we'll see the result on the site.

Working with filters
Filters operate with the same logic as actions. The only difference is that they do not just execute some piece of code in a certain place. They execute this code TO MODIFY some value given to them by the hook. This means that every filter hook has the associated value (in most cases carried by a variable).
The function performing filtering should take this value, alter it somehow and then return it for further usage. So that the syntax of functions responsible for hooks and filters is a bit different.
apply_filters($tag, $value_to_filter, $arg_1, $arg_2, ... , $arg_n);
The function 'apply_filter' creates a filter hook with $tag name and the obligatory parameter $value_to_filter (it could be empty, but should be present for best practice). Other arguments are optional and work the same way as for actions.
filter_function($value_to_filter, $arg_1, $arg_2, ... , $arg_n){
 //filtering code goes here
 return $value_to_filter; //value has to be returned back
}
This is a skeleton of filter function demonstrating that is should a) accept at least one argument, the value for modification; and b) return the value at the end.
add_filter($tag, $function_to_add, $priority, $accepted_args);
The function 'add_filter' registers a function with a name given as the $function_to_add argument for the $tag filter hook. The optional arguments — $priority and $accepted_args — work in the same way as for action hooks.
Let us demonstrate the whole process in action: a common plugin task is to add some content at end of a post. If we look closer at the 'the_content' template tag (queryposts.com/function/the_content), which is normally used to output a post's content in a theme, we will find that it contains following filter hook:
$content = apply_filters('the_content', $content);
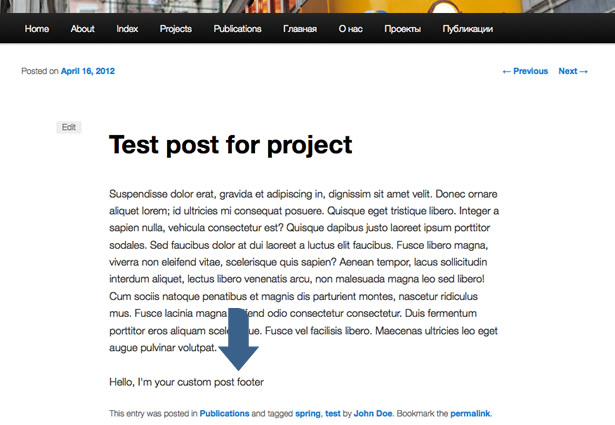
Using this hook we can easily add something to the end of the post in the following way:
function msp_helloworld_post_footer($content) {
 $content .= "<div class='msp-helloworld-post-footer'><p>Hello, I'm your custom post footer</p></div>";
 return $content;
}
add_filter('the_content', 'msp_helloworld_post_footer', 100);
Please notice that we use quite large number for priority here to ensure that all default filters have been applied before our 'msp_helloworld_post_footer'. After including the code in the plugin's file we should see the result on the site:

How to find hooks
It should be obvious by now that for implementing action and filter functionality we need to know what hooks are available.
The WordPress Codex provides an Action Reference with most of action hooks fired on typical page load and a Filter Reference with a list of commonly used filters. These references are useful to understand the order of actions and the logic of filters so that you'll be able to choose where and when functionality can and should be injected.
After that you are ready for the trip into the source code. You can just perform a search through the WordPress files for the 'do_action' and 'apply_filters' keywords to find the hook you need.
Understanding WordPress query logic could also help you work out where some hooks can be looked for.
Finally, you can refer to the WordPress Hooks Database that contains full information about the hooks in the core files.
Advanced operations with hooks
As well as being added to your plugin, actions and filters can also be removed with a similar syntax.
Actions can be removed in the following manner:
remove_action($tag, $function_to_remove, $priority, $accepted_args);
remove_all_actions($tag, $priority);
As you have probably guessed 'remove_action' removes a particular action registered for a particular hook (you have to state correctly the priority and number of arguments as they were used on registration), and 'remove_all_actions' helps to remove all actions registered with a certain hook with a given priority (if the priority argument is omitted the function will remove all actions).
You have probably heard about a popular security recommendation to hide the WordPress version from the head section of the site. This is a job for 'remove_action'.
First of all let's find the code that hooks the 'wp_generator' function to print the version information by browsing /wp-includes/default-filters.php. The code doing this looks as follows:
add_action('wp_head', 'wp_generator');
To eliminate the effect of this code we should somewhere in our plugin, include the opposite function:
remove_action('wp_head', 'wp_generator');
Filters can be removed in a similar way:
remove_filter($tag, $function_to_remove, $priority, $accepted_args);
remove_all_filters($tag, $priority);
The Plugin API also provides developers with a way to detect whether the particular hook has registered functions to execute:
has_action($tag, $function_to_check);
has_filter($tag, $function_to_check);
Both functions check whether a particular action or filter is registered for a hook and returns: true on success, false on failure. Inside the hooked function we have an ability to check what hook has triggered its execution in the following way:
if('hook_to_check_name' === current_filter()){
 //do stuff related to 'hook_to_check_name' hook
}
Despite the name, the 'current_filter' works not only with filters but with actions as well. For the full set of Plugin API functions refer to the Codex.
Real-world case
Let us dig up the plugin skeleton that we prepared in the previous part of the series, and breath some life into it.
We are going to fill-in the 'core.php' file (the central part of our plugin intended to carry the most of functionality) with the code that solves a real-world task with the help of actions and filters.
What we are going to do? Suppose your WordPress site accepts guest posts from different authors, but does not give them permission to create their own accounts for posting. It means that the user, who has published the article, and the real author of it (the guest) are different people. You'll need to ensure that the actual author receives credit. This can be done with custom taxonomy.
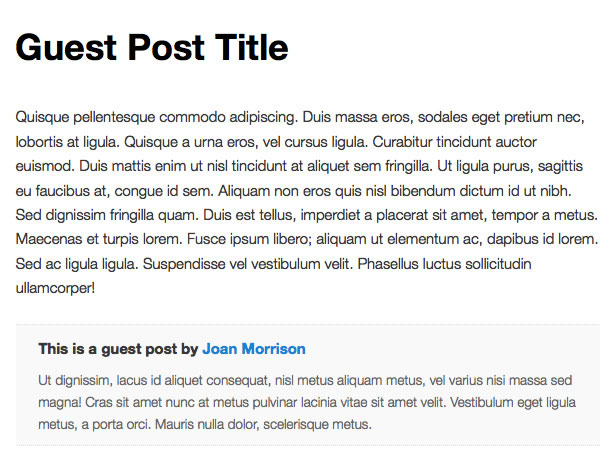
Let us create a custom taxonomy to handle the guest author's name (as a term) and short author's bio (as a description). We would be able to assign author's names as any other taxonomy's terms (as tags) to posts. After that it becomes possible to output an author's box right after the post's text. Here is the code:
/** Hook plugin's action and filters **/
function msp_helloworld_init(){

 add_action('init', 'msp_helloworld_taxonomies');
 add_filter('the_content', 'msp_helloworld_author_block_filter');
 add_filter('post_class', 'msp_helloworld_post_class');

}
add_action('plugins_loaded', 'msp_helloworld_init');

/** Register custom taxonomy **/
function msp_helloworld_taxonomies(){

 $args = array(
 'labels' => array(
 'name' => 'Guest authors',
 'singular_name' => 'Guest author'
 ),
 'show_in_nav_menus' => false
 );

 register_taxonomy('gauthor', array('post'), $args);

}

/** Create author's box markup **/
function msp_helloworld_author_block(){
 global $post;

 $author_terms = wp_get_object_terms($post->ID, 'gauthor');
 if(empty($author_terms))
 return;

 $name = stripslashes($author_terms[0]->name);
 $url = esc_url(get_term_link($author_terms[0]));
 $desc = wp_filter_post_kses($author_terms[0]->description);

 $out = "<div class='gauthor-info'>";
 $out .= "<h5>This is a guest post by <a href='{$url}'>{$name}</a></h5>";
 $out .= "<div class='gauthor-desc'>{$desc}</div></div>";

 return $out;
}

/** Add author's box to the end of the post **/
function msp_helloworld_author_block_filter($content){

 if(is_single())
 $content .= msp_helloworld_author_block();

 return $content;
}

/** Add custom CSS class to the post's container **/
function msp_helloworld_post_class($post_class){
 global $post;

 $author_terms = wp_get_object_terms($post->ID, 'gauthor');
 if(!empty($author_terms)){
 $post_class[] = 'gauthor';
 }

 return $post_class;
}
As you can see, we have created an action to register a custom taxonomy and applied it to the 'init' hook — this is a recommended practice. After that we have created the template tag responsible for the author box's markup using native WordPress functions like 'wp_get_object_terms'. After that we attached this box to the end of post content using the 'the_content' filter hook. And finally we have added the custom CSS class for the guest posts' container for styling flexibility in the theme. After applying some styles we can see the result:

Conclusion
Actions and filters are the most important part of any WordPress development. Now that you understand their logic and behaviour, you're prepared for your own experiments.
What uses have you found for WordPress actions and filters? What would you like to see covered in the next part of this series? Let us know in the comments.
Featured image, Module image via Shutterstock


